Sunday, July 27, 2014

Dandelion & Crazy Eyes

Pretty pleased with my latest set, as we slowly work our way through S2 of OITNB.  No binge watching here, we're lucky to get one episode per night in after the kids are in bed. 


I thought I would document the process of making my dolls.  I love the book AmiguruME and it gives you all the patterns to pretty much make anyone you want, with a little creativity on your part. 

I typically don't decide what to make.  The Muse pretty much plants an idea in my head and once it's there, I can't make anything else until The Muse is satisfied.  So that's Step 1:  Mysterious voices beyond my control put ideas into my head.

Step 2:  The Google.  I image search like crazy.  I study outfits, hair, skin tone and try my best to match those with yarn.  I Google and Google some more.
 

Step 3:  Heads.  I've started putting the faces on at this point, because I hate embroidery and if I leave that for last, I'll end up with a lot of creepy no-mouth dolls.  (I did later change Piper's eyebrows to darker.)  I usually use safety eyes, but I am trying out some brad-type thingies I found.  I liked the  white one, because I could use a sharpie and make the eyes look a little more "crazy" than you'd get with a plain black circle.  Eyelashes are a PITA, BTW.  Just sayin'.


Step 3:  Bodies.   I find legs to be the most tedious, but I love it when a character starts to come together.


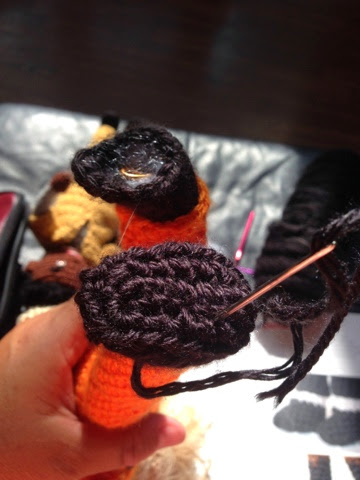
Step 4:  Break out the tools, assemble and stuff.   This part has taken some tweaking.   I have run the floral wire up one leg and out one arm, or through both legs/both arms.  Both methods have their pros and cons when it comes to doll movement, but for simplicity, I mostly wire arms together through the chest and legs together, through the bottom of the body piece.   Stuffing is also a learned art.  Too much and it shows through the stitches terribly and you can't get the head dowel in.  Too little and your doll is floppy.   My latest technique is to stuff lightly, insert the dowel and then use the needle nosed pliers to stuff little bits in around the neck, per the picture.  Either way, it's always fun to bust out the heavy tools for a crochet project!  


Step 5:  Clothes & Accessories.  I winged-it for the tops by modifying the blazer pattern from the book.  This is where you can really have fun with a doll.  Unless you're making prison dolls.   No one feels like Georgio Armani when crafting a khaki jumpsuit. But the tiny toilet paper roll was fun to make!


Step 6:  Hair.  Blergh.  Attaching individual strands of hair is best done while watching an episode from a Netflix Original Series.  This is a first time for using this soft eyelash yarn for hair.  It's super, super soft, but gives off a bit too much of a Lita Ford vibe to me.   Oh well.  I rarely go back and make major changes to a crochet project.  I am not a perfectionist and just tend to push through just to get the to the next big, fun project.   (Hence the title of this blog.) 

 
Oh and Susanne's hair was a blast!   I love it when a character has such a distinctive feature that as soon as you finish it, the yarn comes alive!


Step 7:  Close up the foot.  I mean, it doesn't sound like much, but it's a very finalizing step.  No more stuffing can be added.   Fin.  Done.  Ah....feels good.  


And there you have it!   How the magic happens.  Now go buy the book and make someone fun! 


Wednesday, September 26, 2012

Like the late night DJ, I am taking your requests

I couldn't turn down a couple of requests from friends.  

First up, a newborn baby girl football set.     

Dontcha just love the football buttons?


I am not sure about the leg warmers, wish I had a doll or baby to try them on.  But the pics I have seen on etsy of babies in hats and diaper covers and leg warmers are cute.  See?  And another!  OK, this one is a bit scary.   Plus, I needed something simple to work on in the car on the way to Florida, so there you have it.  Leg warmers. They go well with the ruffle butt, I think.


Next up, angry bird hats.  I made some last year with worsted weight, but I have a special affinity for the Loops & Thread Charisma yarn that I make my owl hats out of and bulky just works up so quickly, I had to try the AB hats in a new way.   I think it worked.

Worst picture quality ever.  Sorry.  If I waited for natural light, this post would never see the 1's and 0's it deserves.
Side view to see the tails and 3D beaks.   


And finally, this isnt an order, but I wanted to try my favorite owl hat pattern as a Hello Kitty Hat.   Cute, no? 

Sunday, September 9, 2012

You would think the second crocheted larynx would be easier

Yes, I have crocheted a larynx before.   For an extra credit project in my dysphagia class and boy howdy, does one get very intimate with the musculature and movement of the larynx when forced to piece it together in yarn.  Extra credit, well played, Prof!   

(Can you believe my little ol' blog is the first hit on a Google Search for Crocheted Larynx?)

But, having since moved onto owl hats and coffee cozies, I put crocheted anatomy behind me for good.  Or so I thought!

I am running in the MS MuckRuckus and offered a free coffee cozy to anyone who donates $10 or more to my team.   I also said that I would entertain custom orders for a donation of $20.  One of my classmates took the bait, donated $20 and asked for a larynx coffee cozy. 

"How hard could it be?" I thought, since I didn't have to do the musculature or the tendons like last time. I could just focus on the bone and cartilage and the trachea already screams "coffee cozy" to me.   AmIRight?

Well, 3 false starts later, I finally made some progress that seemed to work.   I was politely asked what I was working on while in the carpool lane at my daughter's preschool.  Sometimes, honesty is not the best policy..or at least the one that make you look sane. 


Late one night in bed, I had an epiphany as to how to keep the two side together, as well as how to incorporate the vocal folds - elastic hair ties, of course!   Otherwise the top heavy anterior side of the larynx might flop over and not fully protect the users hands from the hot coffee.   (It's all about functionality here at ADHD Crochet!).  


See how it holds the coffee cup snug, right there at the juncture of the thyroid and the cricoid cartilages?


And then...I realized that I made my tracheal rings go all the way around the trachea!   Ack!   A crocheted organ can be functional and aesthetically pleasing all day long, but if it isn't anatomically correct, it might as well be a lowly bag of yarn! 

Out came the scissors and a pointy needle.... 


And the front view...


Although I will probably recommend she stick with the Venti or the Trenta to accommodate that hyoid and epiglottis. 


For anyone else who wants to donate, I might nicely ask you to choose from my existing stock of much less cartilaginous cozies:


Saturday, September 1, 2012

It would have been easier to crochet a bike!

Yes, I'll tie this in somehow to my crochet blog, that is really an all purpose DIY/Crafty blog.    And this was hard enough work to be considered DIY!

My son, who has autism, gets these wild hairs about stuff (I need a snack that starts with K!  Remember my speech therapist from 2nd grade, can we meet her for lunch TODAY?  I need to ride a bike NOW!) and I usually try to accomodate those.  

But the bike thing is tricky.   He outgrew his bike with training wheels, I bought him a bigger bike and a pair of add on training wheels, but the axle wasnt big enough to attach them.   He isnt coordinated enough to steer, pedal and balance.   Hence the problem.

So I set out to create balance bikes for both him and my 4 & 6yr olds who also need to learn to ride on 2 wheels. 

And lo and behold, taking the pedal mechanism off a bike is not that easy!   So I figured I would blog it up and share the youtube videos that a friend shared with me and pay it forward, so that you, too can be drenched in sweat, grease and the satisfaction of makig your own balance bike out of a thrift store cast off, an awl and a hammer!

First up, removing the pedals...did you know the key is that the screws are threaded backwards?  Heh, yeah, that's kind of a key piece of info.


Next, how to remove the chain.   Yeah, who knew the chain was threaded through the solid part of the bike frame.  Well, not I, until I got to that point in the deconstruction process.


Not many things can make you feel invincible like solving a problem with an awl, a hammer and a bolt!   


And voila!  A pile of mangled bike parts to show for the better part of my Saturday!


And one happy little learner:


A happy big learner:


And one who is pretty much ready to move to pedals and no training wheels.  She's got this!


And I get to smell like grease all day! 


Friday, August 24, 2012

It looked better in my head

So I'm on a coffee cozy kick as I build up inventory for a craft fair.  I love coffee cozies, because the "canvas" is quick to whip up (unlike a blanket or even a hat) and then you can add all kinds of fun detail which appeals to my right brain. 

In the midst of sharing my various coffee cozy creations, I had a request for a VW Bug cozy from a friend who is a VW Bug enthusiast.   Being somewhat of a fan myself (my favorite car in the world was my baby blue 69 Beetle, may she RIP after I blew out her engine trying to drive her from CA to GA...*sniff*) I had to pick up the gauntlet.

But alas, it looked so much better in my mind.   I can see that it looks vaguely car shaped.  But Beetle-esque?  I went with the convertable to work around the idea that, by design, a coffee cozy cannot have a domed top.   The headlights and front bumper look crammed together and I cant quite get that rounded front end I was looking for.


I may try again, after the craft fair.  Or I may skip the coffee cozy challenge, and make a straight up plushie.  


Unless my dear readers have any ideas to make it more Bug-shaped? 

Monday, August 13, 2012

Boobies and Bumblebees

My son's private Special Needs school is called MDE School and their "mascot" is the bumblebee.  So I felt inspired to create something for the school this year.   Let me tell you, the bumblebee was cute, quick and did I mention cute?  I could make 12 of him.    The letters on the other hand....quick, sure.    But of the persnickety pattern type where you constantly need to check the pattern while working, "wait, was I supposed to decrease on this side or is that the next row?"   Of course, when making angled and perfectly symmetrical letters, one must be persnickety and the pattern is well written, easy to follow and cheap at $1 per letter.   Just not good for a distracted crocheter like myself.    Oh and she even offers some letters free.


Unfortunately, my 4yr old loves the letters.  And she is learning letters.  Thus, I feel a compulsion to crochet her a set of her own.    Luckily school starts in less than 2 weeks and that does a pretty good job at squelching any and all creativity on my part.

"But what about the boobies?" you may be thinking.  I bring you the boobie hat.   I sooo wish these were around when I was nursing my kiddos.  I love the "in your face" statement it makes about nursing in public (AKA...get over it!) and it's so fun and quick and easy to make.   I especially like that the pattern comes in sizes beyond newborn, since some of us *cough, cough* nurse a bit longer.


I cant wait to see it in action, once my friend has her newest babe and the weather cools down a bit!


Sunday, August 5, 2012

Cuddle Cuddle Up It


Yeah, I was commissioned to make a Cuddleuppet, a blanket that's a puppet.    Which is apparently the most "coolest toy in the world, a'cause the pink monkey comes with a t'nana that he eats!"

Who am I to turn down commissioned work paid in hugs & kisses?

Except the monkey puppet pattern that I tried to follow had some very confuzzling directions, which caused me to just branch out on my own and wing it.  "Wing it" is apparently Jenn-speak for "create a monkey-like head that resembles a cow."


But the recipient is happy, especially once I added the t'nana.


And the other little girl has requested a pink poodle version with a crocheted dog bone.